

CI/CD with Github Actions & Self-hosted Runners
Automating deployment of a simple Express.js app (+ PM2) on my Raspberry Pi


"How do I run the Node.js servers we've built on a spare home PC?"
I had a student ask that the other day.
After an afternoon of putting together what was supposed to be one guide - it resulted in a bunch of guides that I want to share to help other developers finding themselves in his situation.
And because I couldn't find any good ones to recommend - so this is part one of hopefully a couple of related articles on how to get things up and running on the internet with the help of a Raspberry Pi.
And in this part, we'll be looking at how to automate deployment and testing of your Node/Express app from a Github Repository - using Github Actions and Github Runners!
(If you like my student have a spare PC for some reason and not a Raspberry Pi, you could install Ubuntu Server and follow along - let me know if you run into any problems and I'll update the article. I'm doing this with a spare Raspberry Pi)
Requirements
A Server & ssh access
To get started with this - we would need some sort of server to run everything on. In my case I had a spare Raspberry Pi 400 laying around but you could do this with the help of another machine or perhaps reuse an old PC by running Ubuntu Server for example. This should also work on a VPS.
We also need to have Node.js installed on your server to run the Express app as well as ssh access to our server, so we can use
I'm planning to cover how to set this up on fresh Ubuntu Server in another article - I'll post the link here when it's done!
A Github account
Obviously, we would need a Github account to get this to work. And that's what my students are used to - so we'll stick with that. We also need a repository for our simple Express app we're writing in a bit. But we'll cover that in a second!
Setting up a basic Hello World Express app and Repository
First off, we need somewhere to store our code and build from - so you'll have to create a new repository for this.
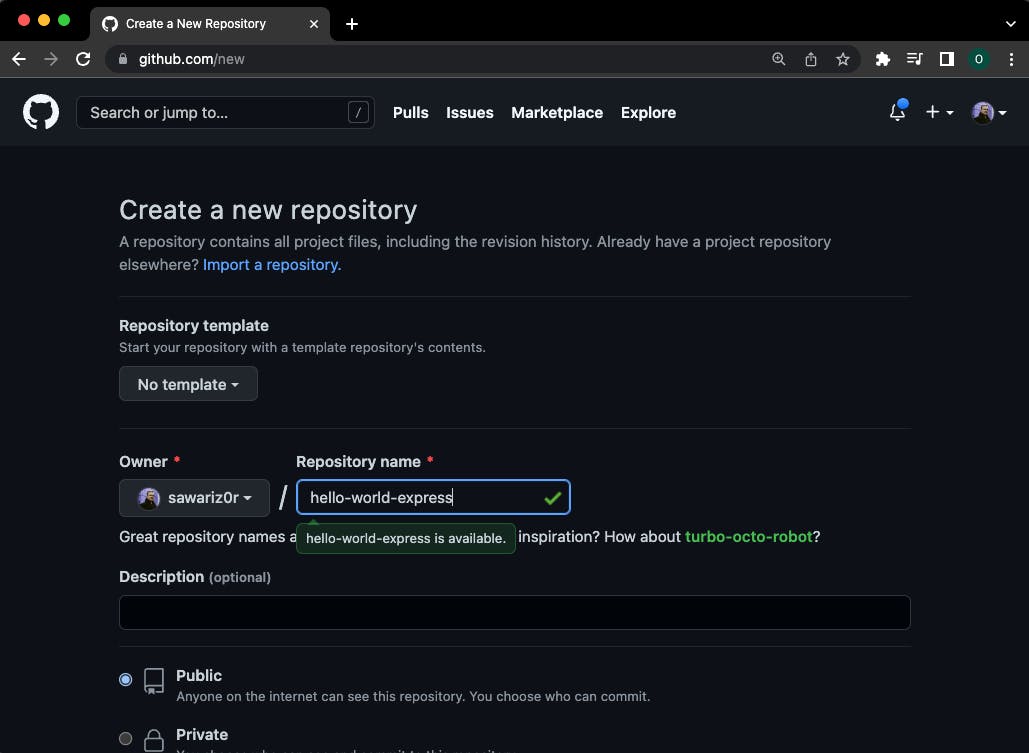
And after you've pressed the fancy green button you'll be greeted with something like this:
Setting up our files & project locally
After we've set that up - it's time to create our simple Express application that will live there. You can do this by opening a terminal window (or equivalent) and navigate to a folder where you want to create the project.
I'm using a folder I call projects/ where I store my projects, so I'm going to navigate there and create the folder I want the source code for the application to exist in.
cd projects/
mkdir hello-world-express
cd hello-world-express
# Voila! We should now be in our folder hello-world-express/
# ... But it's empty. Let's do something about that!
And here we're only going to set up a very basic Express app, but first we need to do a few more things:
# You can name this index.js, app.js or server.js
# But I prefer calling it server.js:
touch server.js
# This will initalize a project using NPM
npm init -y
# Then we need to install our only dependency - Express
npm install express
And don't forget to create the .gitignore
# This will create a file called .gitignore
# with the contents: "node_modules/"
# (Because we don't want that in our Repo!)
echo "node_modules/" >> .gitignore
And now we're ready to actually write our Express application! (If you have one already you'd like to deploy - you could skip this step and continue to the next part)
Writing our Hello world Express application
So we need some server-side code that runs when we send a request to the server. And since I teach Javascript, Typescript, React, Node.js and so on - most of my content will be focused around this stack.
And this article is no exception, because here we'll be using the popular Node.js backend framework called Express.js. It's like the mother of all Node.js backend framework and most of them are actually based on either Express itself or the way you write code with Express.
And we will be doing this in the server.js we created earlier. So open that up and write the following:
// server.js
const express = require("express");
const PORT = process.env.PORT || 4000;

const app = express();

app.get("/", (req, res) => {
  res.send("Hello World!");
});

app.listen(PORT, () => {
  console.log(`haha yes, the server is running on port ${PORT}`);
});
Here we're going to want to define the port declaring the port using ENV=<PORT> and access it through the process.env-object later, so we won't have to edit the code in case we need to run this on another port.
But we'll cover that when we set up the Github Action! (I would normally use a .env-file to store these, but for the purpose of this guide - we'll skip that)
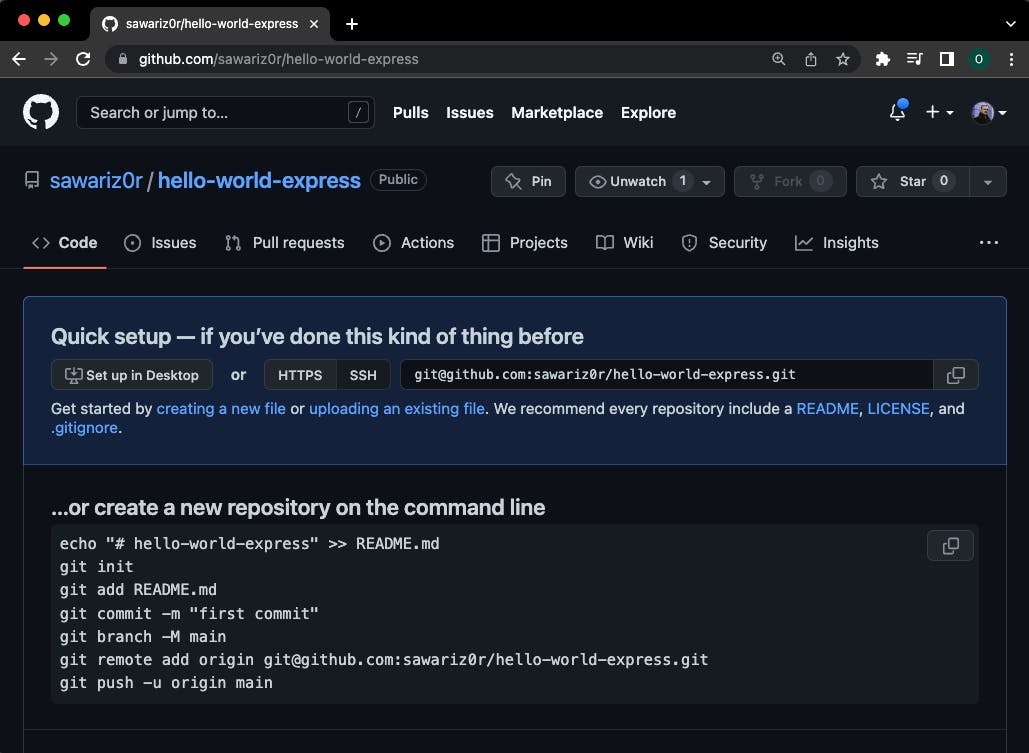
And with that set up, it's time we upload this to the Github repository we created earlier! And we can just follow the instructions under ...or create a new repository on the command line in our empty repository - because why not!
echo "# hello-world-express" >> README.md
git init
# NOTE: Small change here! Instead of git add README.md
# we say git add . to add all the files in the directory.
# It'll save us one commit! (wow! very efficiency, such smart)
git add .
git commit -m "first commit"
git branch -M main
git remote add origin git@github.com:<your_username>/hello-world-express.git
git push -u origin main
It'll even save us some time by creating a README.md for us! Neat!
And when that's done you should have something like this in your repository:
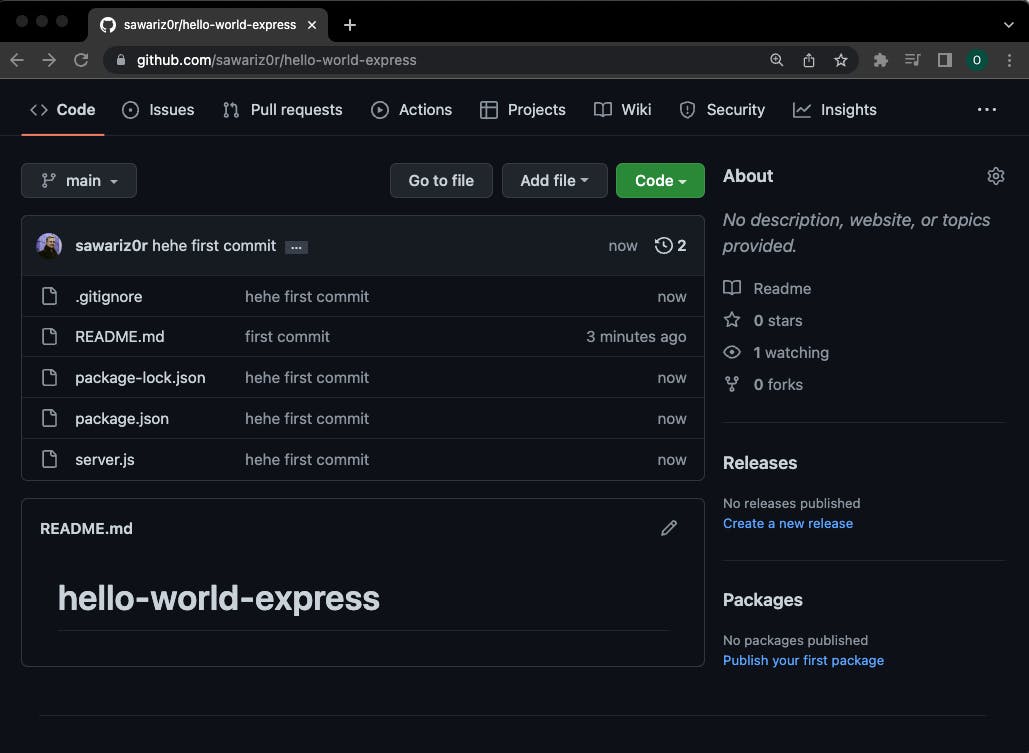
If you've got all your files there - then we're good to go! It's time for us to set up the Runner on our server and some Github Action(s)!
Installing our Self-hosted Github Runner (and why)
So we're setting up and hosting the Runner on our own servers.. Why?
The main reason is so we can set up Github Actions and have them tell the Runner on our server to do certain things. And in this case to automate the deployment of our code whenever we push to our repository. Great for dev environments/servers where we could want to deploy and run tests on our code in an environment that might be very similar or even identical to our production environment.
Where the Runner pretty much sits idle, waiting to recieve a Job that we've specified in our repository under the Github Actions. But we'll get to that part shortly - let's set up the Runner!
Github's handy guide to set up a Self-hosted Runner!
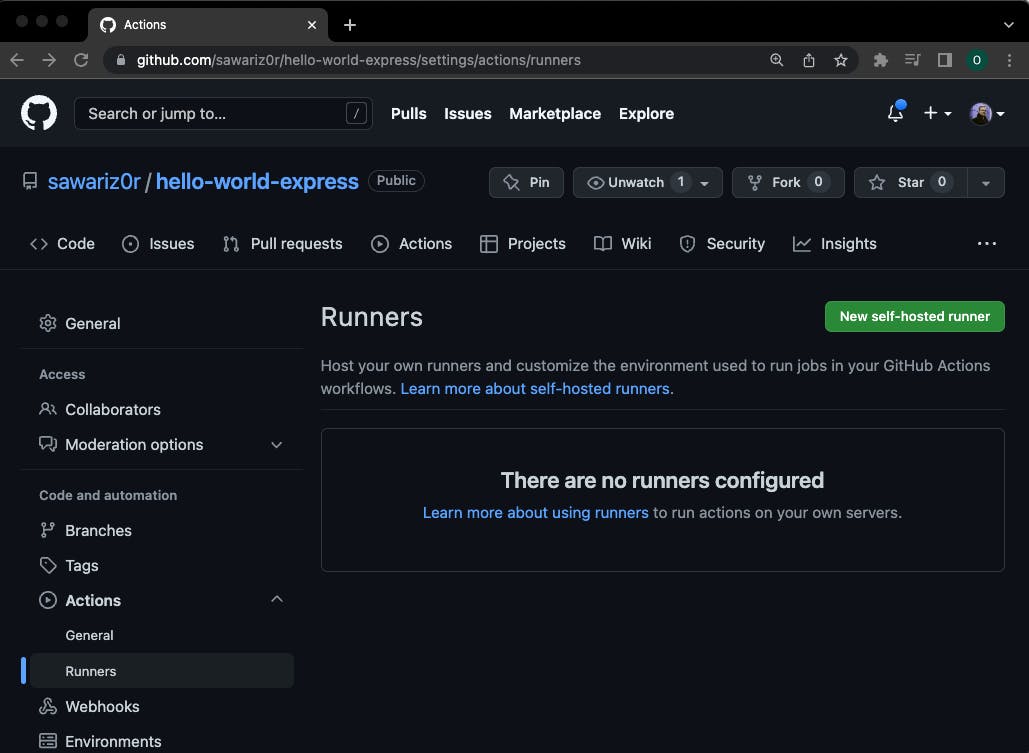
And the easiest way to get this up and running is by following Github's own guide. We can find that under Settings in our repository, by clicking on the sidebar tab Actions and then on Runners.
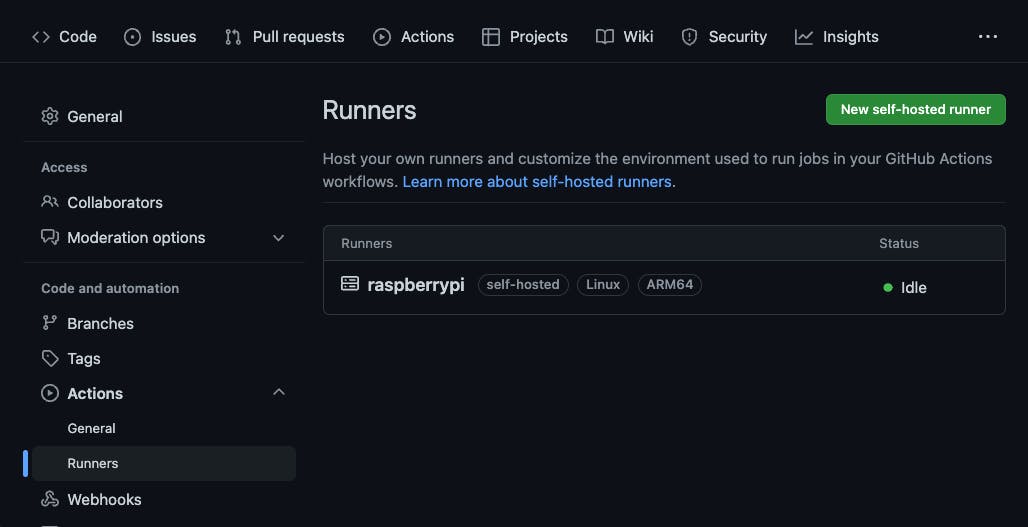
You should see a screen similar to this:
And you see that shiny "new self-hosted runner"-button in the top right corner?
That's the one. Click that one! And you should come to a page similar to this:
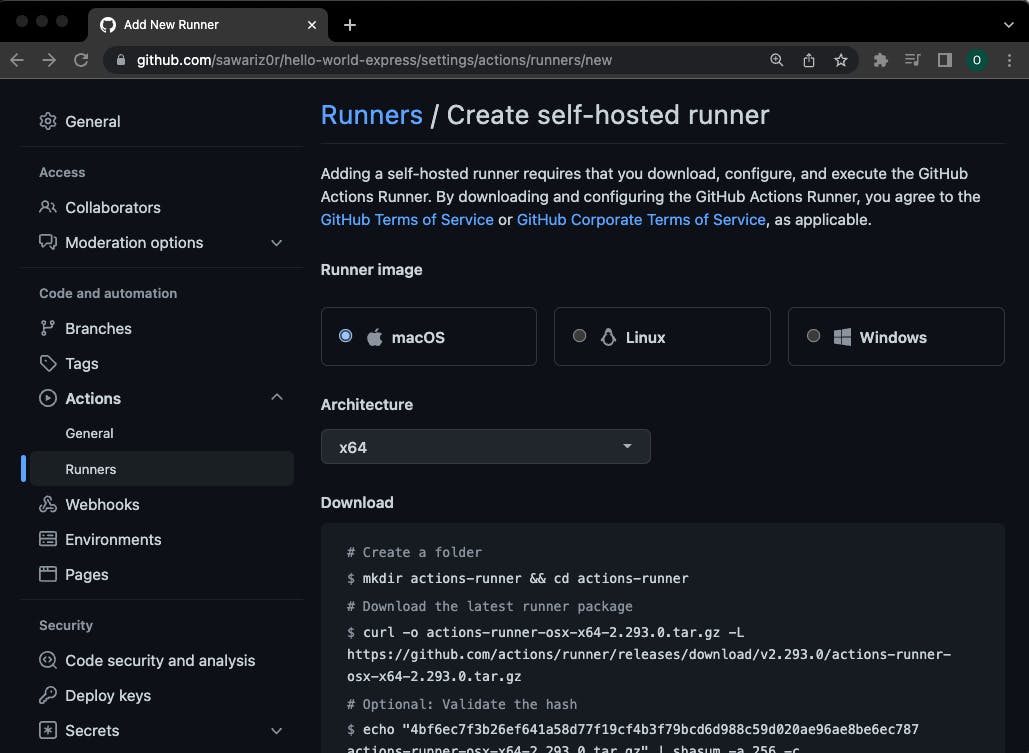
NOTE: For this next step, you want to ssh into to your server and run the instructions there. It'll ask you to create a new folder, create it separate from your repository folder. I put mine in /home/actions-runner
And in order to run a Runner on our server, we need to download the latest runner package, extract the installer and configure the runner. Choose your Platform under Runner image and the Architecture you're running. If you're following along on a Pi, you might want to check which architecture you're running. I've got a Pi 400 and it's running on ARM64.
And if you get this, you've succeeded and your Runner is running:
√ Connected to GitHub

2022-06-17 15:45:56Z: Listening for Jobs
(If it's not, please check out their Monitor & troubleshoot docs and see if it's of any help)
And you should be able to see your Runner under Settings > Actions > Runners.
Creating the deploy action
Now that you have your shiny runner up and running, you should be able to write your first Action!
And with this one, we're going to want to listen to whenever there's a push to a branch. I've chosen to keep an eye on pushes to main and build from there in this case, but if it was a "real project" I'd maybe keep an eye on a dev branch or a production branch and build from that whenever there's a new push. But we're going to stick with main in this case
So how do we write this Action?
To create our first Action, we have to head into our Github repository and into the tab Actions. Where you'll be greeted with a screen similar to this if you have no other actions:
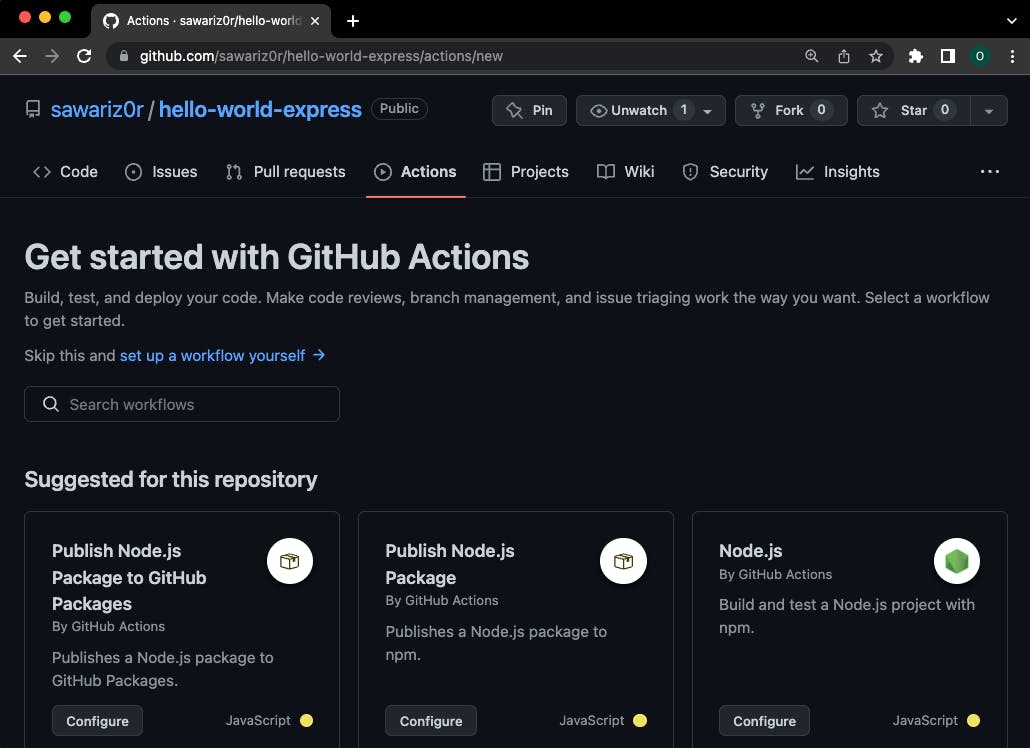
There's plenty of great actions for testing, automation and CI/CD - but we're going to click the set up a workflow yourself link in this case.
Where you should get something like this view here, a .yml-file:
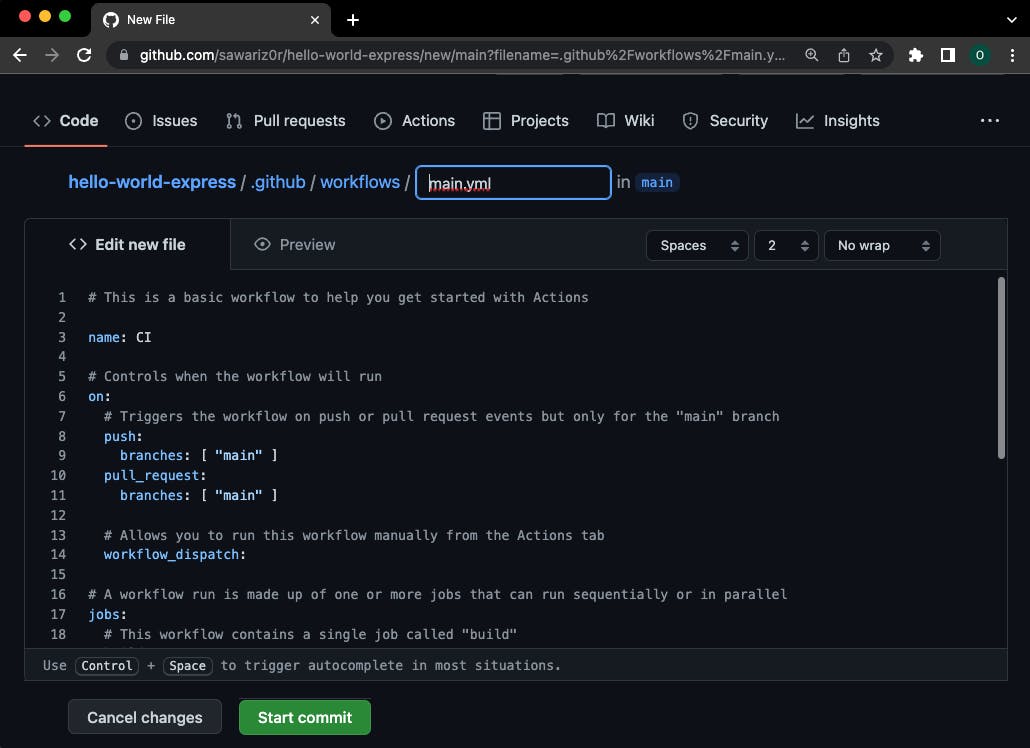
But we're going to empty that and I'll be guiding you step by step on how to write a simple workflow that runs the code in our repository - the Express app we set up earlier. You'll have to keep an eye on the indentation, it's important in .yml-files.
So in this workflow .yml-file, we're going to start off with a simple one. name!
# main.yml
name: CI
And followed by that, we're going to tell the Action to run this whenever we push to the branches: main.
# main.yml
name: CI

# Add this
on:
  push:
    branches: [ main ]
And lastly, the one that can be a tiny bit confusing if you're not used to yaml. I'll walk you through it just after the snippet.
# main.yml
name: CI

on:
  push:
    branches: [ main ]

# Add this
jobs:
  deploy:
    runs-on: self-hosted
    steps:
      - uses: actions/checkout@v2
      - name: Use Node.js
        uses: actions/setup-node@v2
        with:
          node-version: "16.x"
      - name: Install dependencies
        run: npm install
      - name: Run server.js
        run: PORT=4000 npm start
So what are these parts?
runs-on: self-hosted is needed to tell the action that we're using a self-hosted Runner to run this Job.
The job that we named deploy with the bit:
jobs:
  deploy:
The steps is instructions it needs to run, in that order. So we're saying that we want to use the action actions/checkout@v2 which is a minimal action that checks out our Github Workspace so the workflow can access it. It makes things easier.
The second step is an action that helps us set up a Node.js version so we can install/build our app. The node-version is optional, but it's recommended to specify a version and not relying on the system one.
When that's done we're saying that we want to install the dependencies, our node_modules so we can run our app. Followed by the next step "Run server.js" that runs our server using npm start. And here's where we could declare the env-variable PORT - if we don't it's still going to fall back to the 4000 we declared in the file.
And after it's done you're going to want to commit and save this file to your repository.
Which will then run the Action, since that's what it does!
If you click on one of your actions, by the name of the commit - you'll see something like this. (I had to select another port, because 4000 was already taken by another app)
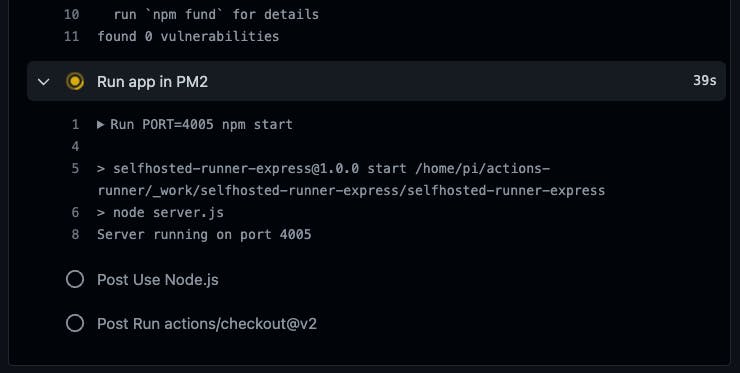
And you'll see that the job is still running.. That's because it's simply running npm start and your Node process will be occupying your Runner until you stop it. And that's not optimal if you want to use your runner for other tasks..
So what we could do is use a process manager that keeps track of these for us, and luckily there's one really handy called PM2.
(Bonus: How to run it with PM2)
You'll find the Quick start in the PM2 documentation here: PM2 Process Management Quick Start
But the steps are few to get it up and running, all we need to do is:
# We're installing this with NPM
# and we're installing it globally with the flag -g
npm install pm2@latest -g
And then to start an app in the background and let PM2 handle it, you just run:
pm2 start server.js
So we could go back and edit the deploy script to run pm2 start server.js instead of npm start!
Note: You'll have to go and cancel the job under Actions before the new one runs, since it'll be occupied by the Node process until you quit it. And that'll take a while for it to happen automatically
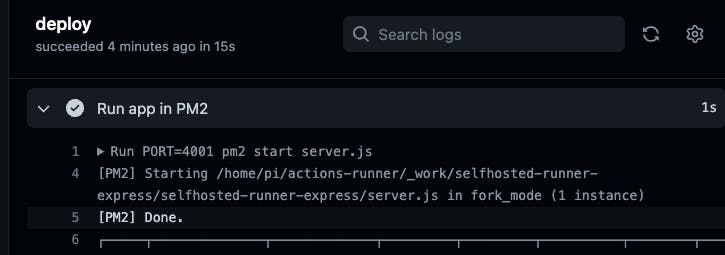
And as mentioned, we have to edit the lines to use PM2 instead of npm start in the main.yml:
       - name: Run app in PM2
          run: PORT=4001 pm2 start server.js
And when you commit the changes to the main.yml it'll run another time, and we should see something like this under "Run app in PM2":
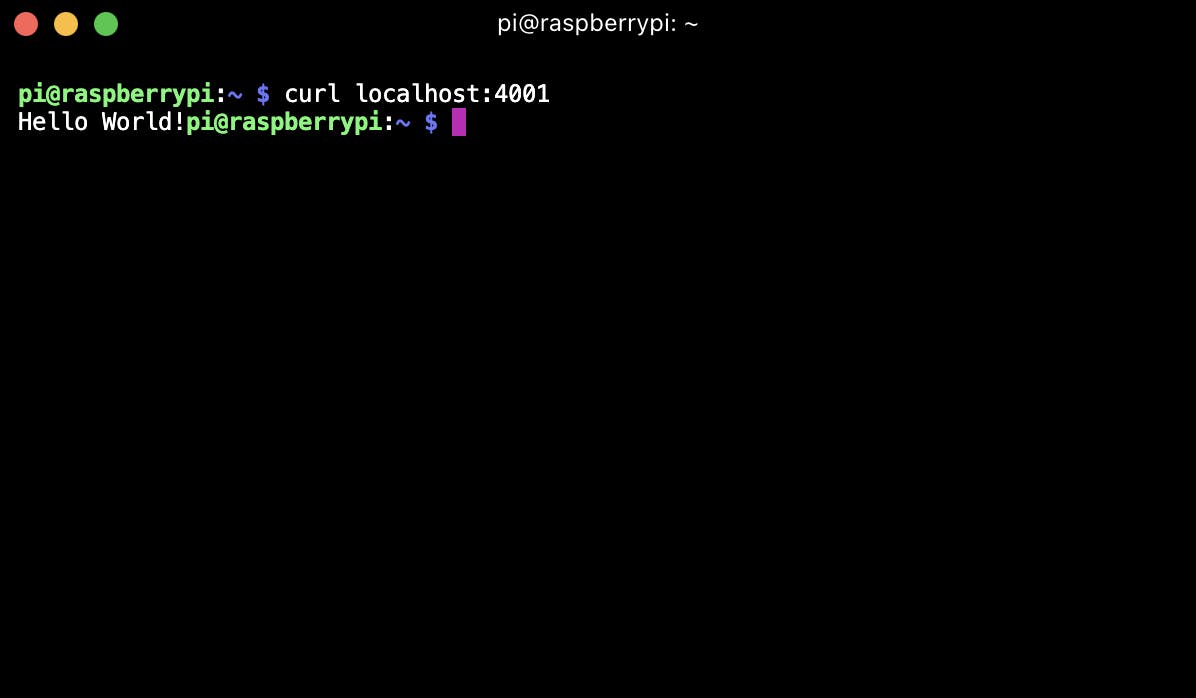
And you can check if it works with curl in the server terminal: curl localhost:4001 - and if you see this you've successfully set up a deploy Action that will run everytime you push to the repository.
(Bonus: Run Runner as a Service)
While you might have been running the Runner in a terminal window and listening to jobs, it might not be the most optimal way to run one. You'll have to open it up manually every time you start or restart your server.
We can solve this by installing it as a service with the following command from the actions-runner folder:
# actions-runner/
# Make sure you stop and close the Runner before these steps

# To install the service
sudo ./svc.sh install

# Starting the service
sudo ./svc.sh start

# And you can check the status with
sudo ./svc.sh status

# Or stop it with
sudo ./svc.sh stop
And you should be seeing your Runner available under Settings > Actions > Runners again.
You can check these steps out here: docs.github.com/en/actions/hosting-your-own..
And that's it! That's how we set up a simple Github Action and self-hosting a Runner to run these jobs!

And that's the end of my first Article! I've got some other interesting guides coming up, with things from a MacOS menu bar app with React Native, Three.js/R3F virtual office dev logs* and other things related to my stack!
I'd be happy if you take a moment to let me know what you thought of the article - too long? not enough memes? not an interesting topic?
And follow me to know whenever I post an article! Thanks for reading!